A walkthrough for anyone stuck with an ISP router (Verizon Fios and similar) that won’t let you add local DNS records. When you’re done:
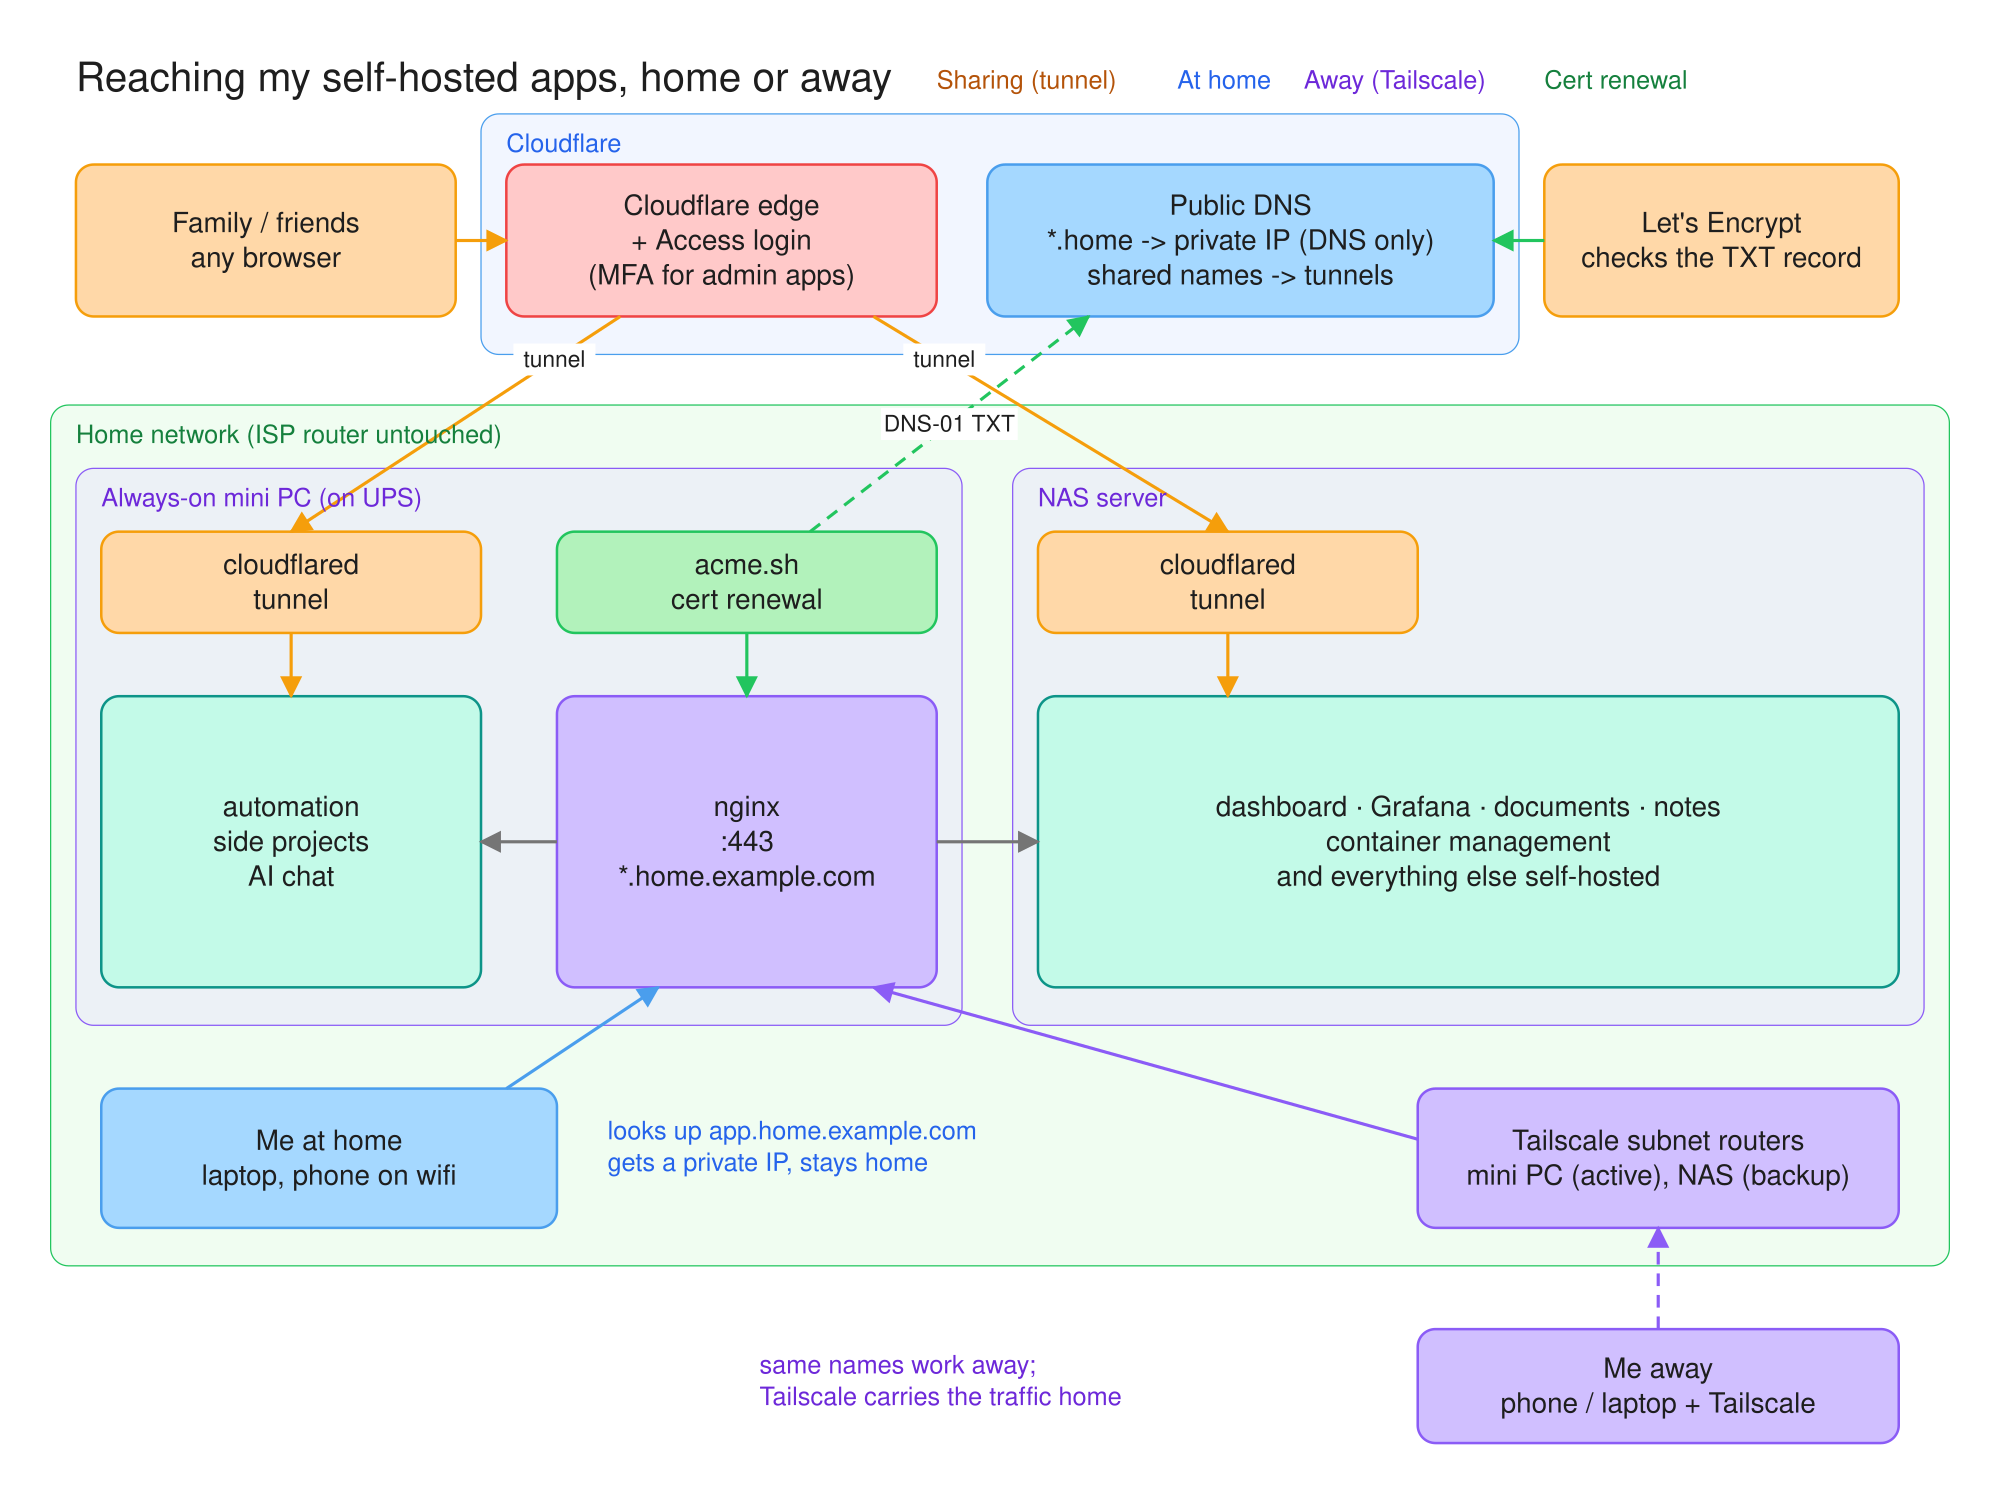
https://grafana.home.example.com(and any other app) works at home with a valid certificate.- The same name works away from home through Tailscale.
- Nothing is opened to the internet, and the router’s DNS settings stay untouched.
Placeholders
Replace these everywhere in the steps below.
| Placeholder | Meaning |
|---|---|
example.com |
your domain, with DNS on Cloudflare |
192.168.1.0/24 |
your home network (Fios default) |
192.168.1.10 |
the always-on machine that will run the proxy |
192.168.1.20:3000 |
an example app (IP:port you use today) |
What you need
- A domain whose DNS is hosted on Cloudflare. The free plan is fine.
- One always-on Linux machine with Docker and Docker Compose. A mini PC or a NAS works. Avoid a Raspberry Pi 3, which is too slow for step 7. It handled about 234 Mbit/s through Tailscale, versus about 851 Mbit/s on a mini PC.
- A free Tailscale account, plus the Tailscale app on your phone and laptop.
1. Give the proxy machine a fixed address
In the router’s DHCP settings, reserve 192.168.1.10 for the proxy machine, so its address never changes.
2. Point a wildcard name at it (public DNS, private IP)
In Cloudflare → your domain → DNS → Records, add two records:
| Type | Name | Content | Proxy status |
|---|---|---|---|
| A | home |
192.168.1.10 |
DNS only (grey cloud) |
| A | *.home |
192.168.1.10 |
DNS only (grey cloud) |
Both records have to be DNS only. Cloudflare can’t reach a private IP, so proxying it would break it.
Anyone can look the name up, but 192.168.1.10 only leads somewhere from inside your network. From the internet it goes nowhere.
Next, check that your router allows it. Some routers block DNS answers that contain private IPs (“DNS rebinding protection”). From a laptop or phone on home wifi, run:
nslookup test.home.example.com
If it answers 192.168.1.10, you’re fine. If it fails, set that device’s DNS to 1.1.1.1, which bypasses the router.
3. Create a narrow Cloudflare API token
This token lets the proxy prove to Let’s Encrypt that you own the domain.
- Cloudflare dashboard → My Profile → API Tokens → Create Token.
- Use the Edit zone DNS template.
- Under Zone Resources, choose Specific zone → example.com.
- Create it and copy the token. You’ll only see it once.
Also copy your Zone ID from the domain’s Overview page (right-hand column).
4. Set up the folder on the proxy machine
mkdir -p ~/home-proxy/{conf.d,certs,acme}
cd ~/home-proxy
umask 077
printf 'CF_Token=%s\nCF_Zone_ID=%s\n' 'PASTE_TOKEN' 'PASTE_ZONE_ID' > cf.env
Keep cf.env out of git and backups you share.
compose.yaml:
services:
  nginx:
    image: nginx:1.27.5-alpine
    container_name: home-proxy
    restart: unless-stopped
    ports:
      - "80:80"
      - "443:443"
    volumes:
      - ./conf.d:/etc/nginx/conf.d:ro
      - ./certs:/etc/nginx/certs:ro
    # Reload every 12h so a renewed cert is picked up automatically.
    command: ["/bin/sh", "-c", "while :; do sleep 12h; nginx -s reload; done & exec nginx -g 'daemon off;'"]

  acme:
    image: neilpang/acme.sh:3.1.1
    container_name: home-proxy-acme
    restart: unless-stopped
    command: daemon
    env_file: ./cf.env
    volumes:
      - ./acme:/acme.sh
      - ./certs:/certs
conf.d/home.conf (one line per app in the first block):
# name -> where the app really lives
map $host $backend {
    home.example.com          http://192.168.1.20:3000;   # dashboard
    grafana.home.example.com  http://192.168.1.20:3033;
    notes.home.example.com    http://192.168.1.20:3003;
    default "";
}

# Apps that only answer to their own IP as Host (see step 6)
map $host $upstream_host {
    default $host;
}

map $http_upgrade $connection_upgrade {
    default upgrade;
    ''      close;
}

server {
    listen 80 default_server;
    return 301 https://$host$request_uri;
}

server {
    listen 443 ssl default_server;
    http2 on;
    server_name home.example.com *.home.example.com;

    ssl_certificate     /etc/nginx/certs/fullchain.pem;
    ssl_certificate_key /etc/nginx/certs/privkey.pem;
    ssl_protocols TLSv1.2 TLSv1.3;

    client_max_body_size 0;      # big uploads
    proxy_buffering off;         # streaming
    proxy_read_timeout 1h;

    if ($backend = "") { return 404; }

    location / {
        proxy_pass $backend;
        proxy_http_version 1.1;
        proxy_set_header Host $upstream_host;
        proxy_set_header X-Real-IP $remote_addr;
        proxy_set_header X-Forwarded-For $proxy_add_x_forwarded_for;
        proxy_set_header X-Forwarded-Proto https;
        proxy_set_header Upgrade $http_upgrade;
        proxy_set_header Connection $connection_upgrade;
    }
}
5. Get the certificate, then start nginx
nginx won’t start until the certificate exists, so start the renewal container first:
docker compose up -d acme

# Issue one wildcard cert via a DNS check (nothing needs to be reachable from outside)
docker exec home-proxy-acme acme.sh --issue --dns dns_cf --server letsencrypt \
  -d home.example.com -d '*.home.example.com'

# Copy it where nginx reads it (acme.sh remembers this for every renewal)
docker exec home-proxy-acme acme.sh --install-cert -d home.example.com --ecc \
  --fullchain-file /certs/fullchain.pem --key-file /certs/privkey.pem
Next, make sure the nightly renewal can find the token. In my setup acme.sh didn’t save it, and its nightly job may not see the container’s environment. Check:
docker exec home-proxy-acme grep -c SAVED_CF_Token /acme.sh/account.conf
If that prints 0, save it (this copies the values inside the container and never prints them):
docker exec home-proxy-acme sh -c 'printf "SAVED_CF_Token='"'"'%s'"'"'\nSAVED_CF_Zone_ID='"'"'%s'"'"'\n" "$CF_Token" "$CF_Zone_ID" >> /acme.sh/account.conf; chmod 600 /acme.sh/account.conf'
Optional: prove renewal works the way the nightly job runs it, with an empty environment. This issues one extra cert, and Let’s Encrypt allows 5 duplicates a week.
docker exec home-proxy-acme env -i HOME=/root PATH=/usr/local/bin:/usr/bin:/bin \
  /root/.acme.sh/acme.sh --renew -d home.example.com --ecc --force --config-home /acme.sh
Then start nginx and test:
docker compose up -d
curl -I https://home.example.com/
From then on the cert renews itself about every 60 days, and nginx picks it up within 12 hours.
6. Fix the apps that complain
Most apps just work. Three common exceptions:
| Symptom | Cause | Fix |
|---|---|---|
| The app shows “host not allowed” or a blank 400/404 page | it keeps a list of allowed hostnames | add app.home.example.com to its allowed-hosts setting (Homepage: HOMEPAGE_ALLOWED_HOSTS) |
| The login page loads, but logging in fails with 403 | a CSRF origin check | add https://app.home.example.com as a trusted origin (Paperless-ngx: PAPERLESS_CSRF_TRUSTED_ORIGINS; Django apps in general) |
| The app only works by IP address | it checks the Host header | in the $upstream_host map, add app.home.example.com 192.168.1.20;, and add proxy_redirect http://192.168.1.20/ /; in location / |
After any change to conf.d, reload nginx:
docker exec home-proxy nginx -s reload
7. Make the same names work away from home (Tailscale)
Install Tailscale on the proxy machine and make it a “subnet router” for your home network. Then your phone can reach 192.168.1.10 from anywhere.
curl -fsSL https://tailscale.com/install.sh | sudo sh

printf 'net.ipv4.ip_forward = 1\nnet.ipv6.conf.all.forwarding = 1\n' | sudo tee /etc/sysctl.d/99-tailscale.conf
sudo sysctl -p /etc/sysctl.d/99-tailscale.conf

sudo tailscale up --advertise-routes=192.168.1.0/24 \
  --accept-routes=false --accept-dns=false --operator=$USER
What the flags do:
--accept-routes=falsestops the proxy machine from sending its own home traffic through Tailscale.--accept-dns=falseleaves its DNS alone.--operator=$USERlets you manage Tailscale on it later without sudo.
Then, in the Tailscale admin console (login.tailscale.com → Machines):
- Open the proxy machine → Edit route settings → tick
192.168.1.0/24. - Open the same menu → Disable key expiry, so it doesn’t drop off in six months.
- On Android, check that the Tailscale app has Use Tailscale subnets turned on.
If you want a backup router, advertise the same route from a second fast machine. Tailscale picks one router to be active and fails over automatically when it goes offline. You can’t choose which one is active, though. In my setup it kept picking a slow Raspberry Pi, so only use machines you’d be happy to have carry the traffic.
8. Check that your phone connects directly
With your phone on cellular (wifi off) and Tailscale on, run this on the proxy machine:
tailscale ping <your-phone-name>
via [2600:...]:portorvia <public IP>:portmeans a direct connection. Good.via DERP(nyc)means it’s going through a Tailscale relay. It still works, but bandwidth is limited.
On Verizon, phone and home both had IPv6, so the connection was direct with no port forward. If you stay stuck on DERP (common on IPv4-only networks), forward UDP 41641 on the router to 192.168.1.10. That’s Tailscale’s own encrypted port, and it ignores anyone without a key to your tailnet.
9. Security checklist
- Nothing new is open to the internet. The router has no port forwards, unless you added the optional UDP 41641.
- nginx doesn’t log anyone in. Anyone on your wifi or your tailnet can reach these names, so every app needs its own login.
- Nothing admin-level listens on all interfaces without a password. Run
ss -tlnpon each host and check every0.0.0.0:line. I found a container-management API (Podman, port 2375) open this way and bound it to127.0.0.1. - Put visitors and smart-home gadgets on the router’s guest network.
- Remove old devices from the tailnet. An old machine whose key never expires can rejoin later.
- As a bonus, certificate transparency logs only show
*.home.example.com, not your app names.
Adding an app later
- Make sure the app has its own login.
- Add one line to the first map in
conf.d/home.conf, then rundocker exec home-proxy nginx -s reload. No DNS or certificate work needed. - If someone outside your tailnet needs it, publish it through a Cloudflare Tunnel with Cloudflare Access instead.
That’s it!